 |
|
 Dec 16, 2007, 05:25 AM // 05:25
|
#1 |
|
Perfectly Elocuted
Join Date: Sep 2005
|
Ok guys, this thread here, while full of lots of useful information, was getting ridiculously large and hard to sift through. In the interest of having the most useful posts/threads for all your mapping needs in a handy travel size thread, I've re-posted some of the gems from the previous threads. If I am missing some information that you feel should be included in this pseudo-guide please send me a PM and I'll do my best to see that it's included.
In the interest of keeping this thread as clean and user friendly as possible there are a few ground rules! 1.) Do not post Screen Shots of your completed titles. That is what the screen shot forum is for. 2.) Be sure to be a specific as possible when asking questions. You may post images of your maps as long as they follow forum guidelines (ie...not to big!) to aide you in asking your question. 3.) Do not post without either: Offering usable advice to someone that has asked a question or Asking a specific mapping question. 4.) Please enjoy!
__________________
" Capital letters were always the best way of dealing with things you didn't have a good answer to." Last edited by Marty Silverblade; Aug 17, 2012 at 10:07 AM // 10:07.. Reason: revised op |

|

|
 Dec 16, 2007, 05:26 AM // 05:26
|
#2 | |
|
Perfectly Elocuted
Join Date: Sep 2005
|
First of Livingston's excellent guide.
Original Thread: http://www.guildwarsguru.com/forum/s...php?t=10032479 Quote:
__________________
" Capital letters were always the best way of dealing with things you didn't have a good answer to." |
|

|

|
 Dec 16, 2007, 05:28 AM // 05:28
|
#3 | |
|
Perfectly Elocuted
Join Date: Sep 2005
|
Original Post:
http://www.guildwarsguru.com/forum/s...76&postcount=2 Quote:
__________________
" Capital letters were always the best way of dealing with things you didn't have a good answer to." |
|

|

|
 Dec 16, 2007, 05:29 AM // 05:29
|
#4 | |
|
Perfectly Elocuted
Join Date: Sep 2005
|
More Livingston:
http://www.guildwarsguru.com/forum/s...84&postcount=3 Quote:
__________________
" Capital letters were always the best way of dealing with things you didn't have a good answer to." |
|

|

|
 Dec 17, 2007, 10:51 PM // 22:51
|
#5 |
|
Academy Page
Join Date: Aug 2007
Guild: Highland Tsunami [HT]
Profession: N/Mo
|
Alright, it may be just me but the instructions for number 15 Luxon are confusing. I have tried what you said about 15 times and I still cant map that stupid area. Im down to the wire and I need that little bit to help. >.<"
|

|

|
 Dec 18, 2007, 12:10 PM // 12:10
|
#6 |
|
Forge Runner
Join Date: Jun 2006
Guild: Hard Mode Legion [HML]
Profession: N/
|
Katherine,
I hope we are talking about the same spot. I don't have the exact way of approach to get the spot, but can give some general information. There are some spots, like no. 10 (small brown item in upper part, still covered on this picture) that require a precise character placement. The same is with no. 15. When I look at the advice Shyft gave (he was the original poster), the spot is either hit there or from the boss located west from that location. For spots like this it's inch forward, change direction a little, inch back, rinse and repeat till you hit the spot. However, given that there is more than 100%, if you can't hit the spot you could decide to leave it, specially when you have both Jade Quarry and Shing Jea area. |

|

|
 Dec 18, 2007, 07:19 PM // 19:19
|
#7 |
|
Academy Page
Join Date: Aug 2007
Guild: Highland Tsunami [HT]
Profession: N/Mo
|
Thing is, I used those maps really early and now Im at 97.9% with most of the commonly missed areas covered having no clue what else Im missing. >.< And I was really hoping to get this done before Wintersday. Thanks for the advice though. I will try to move Katherine in the right spot. And yes, we were talking about the same area. ^^"
Edit: I just totally got that area. I searched again and found the spot I was missing! Go me! ^^ Im at 98% now. Last edited by katherinetheblood; Dec 18, 2007 at 07:38 PM // 19:38.. |

|

|
 Jan 01, 2008, 05:00 AM // 05:00
|
#8 |
|
retired
Join Date: Jun 2006
|
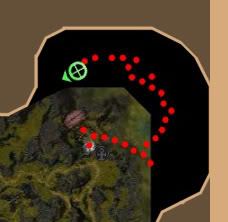
ok i hope someone can answer this for me since i have no idea how to get to the place...number 11 on the mount qinkai map it says its NW corner of arbourstone explorable but i cant find a path to that area.
If anyone could help me it would be really helpful. |

|

|
 Jan 04, 2008, 01:24 AM // 01:24
|
#9 |
|
Academy Page
Join Date: Aug 2007
Guild: Highland Tsunami [HT]
Profession: N/Mo
|
The key is to start at Arborstone Explorable at the one mission outpost outside House Zu Heltzer. If you go northward as you can from that area you will reach it in no time.
|

|

|
 Jan 07, 2008, 09:15 AM // 09:15
|
#11 |
|
retired
Join Date: Jun 2006
|
I have the same spots as u have so any help would be great.
This spot i just have no idea how to get....  anyone???? Last edited by bodyboarder; Jan 08, 2008 at 03:06 AM // 03:06.. |

|

|
 Jan 09, 2008, 12:08 AM // 00:08
|
#12 |
|
Krytan Explorer
Join Date: May 2006
Location: Croatia
Guild: Precko Boys [PREX]
Profession: W/
|
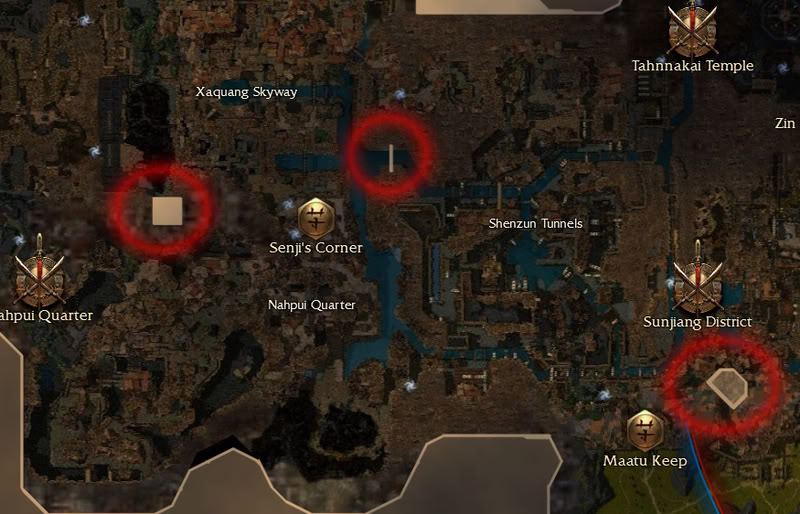
I have problems with last 0.9%. In there are jade quarry, fort aspenwood and this:
Are areas in red circles exporable, and how can i explore green circled areas? |

|

|
 Jan 09, 2008, 01:16 AM // 01:16
|
#13 |
|
Lion's Arch Merchant
Join Date: Oct 2006
Location: England
Guild: STOP VIRGIN MEDIA!
Profession: Mo/E
|
The piece you are after by maatu keep puzzled me for a bit. What you need to do is enter Sunjiang District (explorable) from the south. E.g from Pongmei Valley. Just keep heading West and you'll get it. Let me know how you get on.
|

|

|
 Jan 09, 2008, 01:23 AM // 01:23
|
#14 |
|
Lion's Arch Merchant
Join Date: Oct 2006
Location: England
Guild: STOP VIRGIN MEDIA!
Profession: Mo/E
|
And body boarder. The piece you are talking about by arborstone, you need to leave from tanglewood copse and bring a tele skill like Necrotic Traversal. Go to the lift operator and you can aggro the kirin. Once you've killed one tele down to its corpse. Be quick as they create minions which with use up the corpse. Once your down flag your heroes through the tanglewood portal and they will tele down to you. From there you can explore freely
|

|

|
 Jan 09, 2008, 01:28 AM // 01:28
|
#15 |
|
Lion's Arch Merchant
Join Date: Oct 2006
Location: England
Guild: STOP VIRGIN MEDIA!
Profession: Mo/E
|
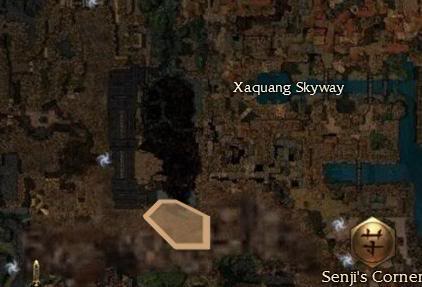
As pretty much everyone uses this package for texmod now, I think it would be useful for us to post the "Black bits" that we explore that arent shown with the mod. Here's one to show you what i mean and to get us going.
|

|

|
 Jan 09, 2008, 09:49 AM // 09:49
|
#16 |
|
Krytan Explorer
Join Date: May 2006
Location: Croatia
Guild: Precko Boys [PREX]
Profession: W/
|
Awsome. You helped alot with that "black spot" idea. I noticed i have quite a few black spots discovered, all you need to do to get them is hug walls in fallowing outposts: west part of saint anjeka's shrine, SE part of druham archives, west wall of Amastz Basin (you may need to go outside and hugg the wall to the SW)
A good ides would be not to trust too much to text mod, but use livingston's guides (you'll uncover a bit of black spots as well, just check commonly missed spots): http://www.guildwarsguru.com/forum/s...ngston+gui de Last edited by shogun avatar; Jan 09, 2008 at 11:00 AM // 11:00.. |

|

|
 Jan 09, 2008, 11:21 PM // 23:21
|
#17 | |
|
Desert Nomad
Join Date: May 2006
Profession: A/
|
Quote:
|
|

|

|
 Jan 09, 2008, 11:38 PM // 23:38
|
#18 |
|
retired
Join Date: Jun 2006
|
So anyone know where to go to the place i posted up above 7 posts up
|

|

|
 Jan 09, 2008, 11:53 PM // 23:53
|
#19 |
|
Frost Gate Guardian
Join Date: Mar 2007
Location: Wales
Guild: No longer actively playing.
Profession: N/
|
Black Spots:
Use The shadow Step trick on the merchant to get this area. Most of the area in Jade Quarry is "Black Spotted", To get top left talk to the Luxon Commander and ask "Replay the misson cinematic" (Thanks Livingston) Last edited by Hatchet Child; Jan 09, 2008 at 11:57 PM // 23:57.. |

|

|
 Jan 09, 2008, 11:55 PM // 23:55
|
#20 | ||
|
Desert Nomad
Join Date: May 2006
Profession: A/
|
Quote:
Here. Quote:
 Last edited by MrGuildBoi; Jan 10, 2008 at 12:05 AM // 00:05.. |
||

|

|
 |
|
«
Previous Thread
|
Next Thread
»
| Thread Tools | |
| Display Modes | |
|
|
 Similar Threads
|
||||
| Thread | Thread Starter | Forum | Replies | Last Post |
| Tyrian Tour Guide! (Cartographer Tips and Questions thread) | SnipiousMax | Explorer's League | 227 | Nov 01, 2015 10:56 PM // 22:56 |
| Livingston's Guide to becoming a Grandmaster Canthan Cartographer! (No Map Checks) | Livingston | Explorer's League | 424 | Dec 16, 2007 05:35 AM // 05:35 |
| Canthan Grandmaster Cartographer in a day - What's A-Net going to do about it? | Torqual | The Riverside Inn | 580 | Nov 16, 2007 10:30 AM // 10:30 |
| Running World Tour for TIPS | Rid Dic K | Services Offered | 10 | Feb 15, 2006 04:19 AM // 04:19 |
All times are GMT. The time now is 12:53 PM // 12:53.


 Linear Mode


